Cleanfeed enables you to record a session with anyone, wherever they are in the world — with the highest quality. It could be a podcast interview, voiceover recording or or something else. We’ll take you through your first Cleanfeed session and how to record it.
Using a compatible browser, sign up for a Cleanfeed Lite account. If you already have a Cleanfeed account, sign in with your login name and password.
If this is the first time you’ve signed in to Cleanfeed, you’ll be asked to give us permission to use your microphone. We can’t do useful things without that, so you should choose to Allow while visiting the site
Having trouble signing in? Your login name is the one you chose at sign up. It’s not your email address.
From the main Cleanfeed studio screen, press the Gear icon at the right side of the grey row showing your name. From the drop-down menu listing available devices, select your microphone or the audio interface it is connected to.
If you don’t see your microphone in the list, wait a moment and then try the menu again. If it’s a USB microphone, sometimes it will take a moment before the device is available to your browser.
To the right of the green and white Microphone icon , and to the left of your name, is a small vertical audio meter.
This meter is a visible indication of the audio coming from your microphone. When the sound is too loud, the meter will show red. Too low, and you will only see green on the meter. For best results, make sure your microphone is set up so that when you are speaking the level peaks in the yellow area of the meter, between green and red.
If you’re speaking and using the microphone properly, but the meter is still not touching the yellow area, you can adjust the input level or Gain control. For the best sound quality, increase the dials on the microphone or audio interface before boosting the level using the computer — if you need to, check the instructions from the manufacturer.
Now your audio is set up, it’s time to invite your first guest to join your Cleanfeed session.
Press the large +CONNECT button in the middle of the main screen. Press the Share button, enter their email address and then press Send.
Your guest will receive an invitation to their email address, looking like the example below. All that they need to do is press the green CONNECT button to open their browser and join the session.

When your guest arrives, Accept them into your studio.
Once connected, you’ll see a new row in the main Cleanfeed studio screen with a green and white Telephone icon and the name of your guest. Your guest’s audio meter will be shown on this row of the studio screen, too. Each row also functions as a button to mute, or unmute the guest when you press on it. You can repeat this process to invite additional guests to the session.
Guests don’t need a Cleanfeed account. Their CONNECT button has just one purpose — connecting them to your session.
Now that your guest is connected to the Cleanfeed session and able to chat to you, it’s time to record what’s going on.
Press the Record button in the top left corner of the main Cleanfeed studio screen, which will display the options available to you for the recording. Press the blue Record button to begin the recording.
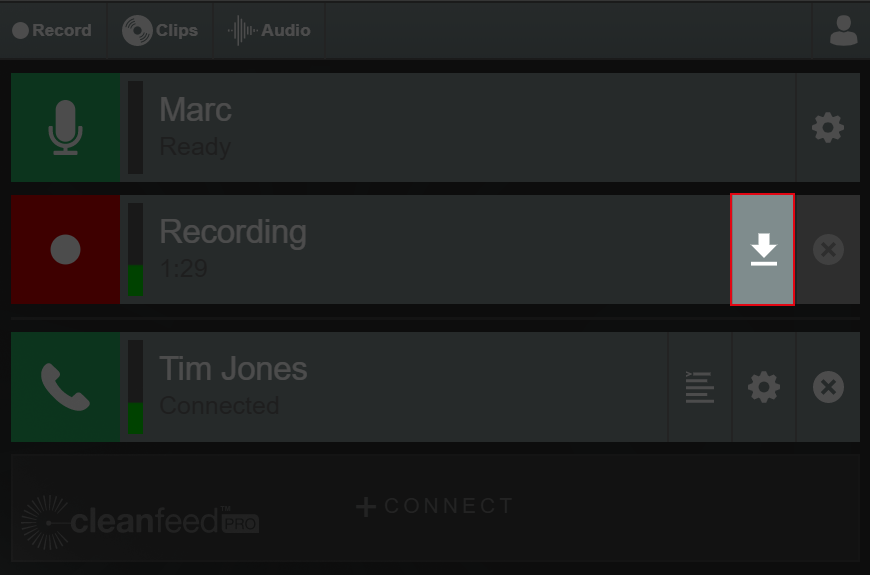
The recording is shown in its own row on the screen, which also functions as a pause button, with a Record icon of a white circle in a red square. You will see the Recording meter moving up and down when you or your guests speak.
When you’ve finished your session, you’ll want to save the recording so that you can edit or share it.
On the right side of the Recording row, press the white Save icon , which looks like an arrow pointing downwards. Your browser will save the file to your computer.
You can now open this file in your audio editor, and check that you recorded what you meant to. For longer recordings, you can press the Save icon at any time to save an intermediate recording, which you can do again and again.
When you’ve saved the recording, the Remove icon on the right side of the Recording row, which looks like a small grey cross in a white circle, can be used to remove the recording from the Cleanfeed studio screen.
It’s a good idea to check the saved recording in another application before removing the recording or closing Cleanfeed. Remember, your audio is encrypted over the Internet; we can’t hear your audio or keep a copy on our servers.
You’ve just made your first recording with Cleanfeed! If you can’t hear one of your guests in the session or they can’t hear you, check out our guide for that.